Summer calls for fun, vibrant, and utterly delicious treats that are as easy to make as they are delightful to eat. When you’re planning your next BBQ or outdoor gathering, skip the oven and impress your guests with something truly special: homemade vibrant watermelon Rice Krispies treats! These adorable, no-bake delights are a playful twist on a classic childhood favorite, perfectly capturing the spirit of summer in every chewy bite. Both kids and adults can't resist their charm and delicious flavor, making them an instant hit for any casual get-together.
Imagine serving up dessert that looks exactly like tiny slices of watermelon – complete with green rind, pinkish-red flesh, and even chocolate chip "seeds." These easy no-bake watermelon Rice Krispies for summer fun are not just a treat; they're an experience. They embody everything you love about warm-weather festivities: bright colors, sweet flavors, and effortless enjoyment. Let's dive into how you can create these fantastic watermelon Rice Krispies treats and make your next BBQ unforgettable.
Why Watermelon Rice Krispies Treats are a Summer Sensation
What makes these treats an absolute must-have for your summer repertoire? It's a combination of nostalgia, convenience, and undeniable visual appeal:
- No-Bake Brilliance: When temperatures soar, turning on the oven is the last thing you want to do. These watermelon Rice Krispies treats require absolutely no baking, keeping your kitchen cool and your energy levels high.
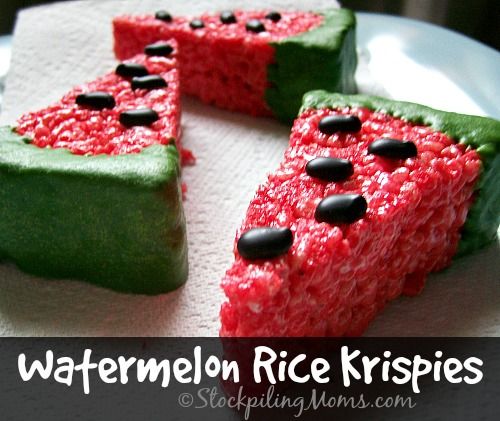
- Irresistibly Adorable: Let's be honest, half the fun is how cute these look! Mimicking a real watermelon, they instantly bring a smile to anyone's face. They're a fantastic conversation starter and a feast for the eyes before they even reach your palate.
- Kid-Friendly & Crowd-Pleasing: Rice Krispies treats are a timeless classic, beloved by generations. Adding the watermelon theme makes them even more appealing, especially to younger guests who will be fascinated by their likeness to the actual fruit. Adults, too, will appreciate the playful nod to summer.
- Simple & Quick: You don't need to be a seasoned baker to whip up a batch of these. The process is straightforward, using common pantry ingredients, making them perfect for busy hosts or a spontaneous party.
- Perfect for Any Occasion: While "BBQs" are in the title, these treats are versatile enough for pool parties, picnics, potlucks, birthday parties, or just a fun afternoon snack. Their sturdy nature makes them easy to transport.
These treats aren't just easy; they truly transform a simple dessert into a memorable highlight. For more ideas on party treats, check out adorable watermelon Rice Krispies: perfect party treat for kids.
The Secret to Vibrant Watermelon Hues: Ingredients & Technique
The magic of these watermelon Rice Krispies treats lies in their vibrant colors and, optionally, their authentic watermelon flavor. Here’s what you'll need and some crucial tips for achieving that perfect look:
Essential Ingredients:
- 1 package (10 ounces) Miniature Marshmallows: Fresh marshmallows are key for the best chewy texture. While the recipe calls for one package, many enthusiasts recommend adding a little extra for an even chewier, gooier treat!
- 3 tablespoons Canola Oil (or butter): Canola oil helps create a smooth, pliable mixture that’s less sticky than butter, though butter can be used for a richer flavor.
- 6 cups Rice Krispies Cereal: The classic choice for that unmistakable crunch.
- Food Coloring:
- Approximately 1/4 teaspoon green paste food coloring for the rind.
- Approximately 1/4 teaspoon pink paste food coloring for the lighter flesh.
- Approximately 1/8 teaspoon red paste food coloring for deepening the flesh color.
Pro Tip on Food Coloring: While regular liquid food coloring will work, gel food coloring is highly recommended for achieving truly vibrant, concentrated colors without adding excess moisture to your treats. Gel colors deliver richer hues with less product, giving your watermelon treats that striking, authentic appearance.
- 1 teaspoon Watermelon Extract (optional, but highly recommended): This is the game-changer! Adding a touch of watermelon extract ensures your treats not only look like watermelon but taste like it too, elevating the entire experience. You can typically find this in the baking aisle or specialty baking stores.
- 1/3 cup Miniature Semisweet Chocolate Chips: These are crucial for creating the realistic "seeds." Mini chips are perfect for scale.
Crafting Your Watermelon Masterpiece: A Step-by-Step Guide
Making these watermelon Rice Krispies treats is a fun and rewarding process. Follow these steps for perfect results:
1. Prepare Your Workspace and Pans
Lightly grease two 9-inch round cake pans with butter or cooking spray. You'll also want to grease a spatula or your hands (lightly, with a flavorless oil) to help press the mixture without sticking.
2. Melt the Marshmallow Base
Combine the miniature marshmallows and canola oil (and watermelon extract, if using) in a large saucepan. Melt over low heat, stirring constantly until the mixture is smooth and fully combined. Alternatively, you can do this in a microwave-safe bowl, heating in 30-second intervals and stirring until smooth.
3. Divide and Conquer with Color
Once melted, remove the marshmallow mixture from the heat. Divide it roughly in half and transfer one half to a separate bowl or another saucepan (you can keep it over very low heat to maintain pliability if needed, but be careful not to scorch).
- For the Green Rind: To one half of the marshmallow mixture, stir in the green paste food coloring. Add it gradually until you achieve a vibrant green that resembles a watermelon rind. Once the color is uniform, quickly fold in 3 cups of Rice Krispies cereal until thoroughly coated.
- For the Pinkish-Red Flesh: To the remaining half of the marshmallow mixture, add the pink and red paste food coloring. Start with pink, then add red incrementally to get a deep, luscious pink that mimics watermelon flesh. Stir well to combine. Then, quickly fold in the remaining 3 cups of Rice Krispies cereal until fully coated.
4. Assemble Your Watermelon Slices
This is where your treats take their iconic shape:
- Form the Rind: Take half of your green Rice Krispies mixture and press it evenly around the inside edge of one of your lightly greased 9-inch round cake pans. Use your greased spatula or waxed paper to firmly pack it down, creating a solid green ring.
- Fill the Flesh: Now, take half of your pink Rice Krispies mixture and press it firmly into the center of the green ring. Ensure it's flush with the green and evenly distributed.
- Add the Seeds: While the pink mixture is still warm and slightly soft, gently press about half of the miniature chocolate chips into its surface. These are your watermelon seeds!
- Repeat: In your second prepared cake pan, repeat steps 1-3 with the remaining green mixture, pink mixture, and chocolate chips.
5. Cool and Cut
Allow both pans of treats to cool completely at room temperature. This can take anywhere from 1-2 hours. Once firm, carefully remove the large round treats from the pans. Using a sharp, greased knife, cut each round into 12 wedges, just like you would a real watermelon slice.
Tips for Perfection and Creative Variations
Elevate your watermelon Rice Krispies treats even further with these insights:
- Extra Chewy Factor: If you love super chewy Rice Krispies treats, consider adding an extra handful (or two!) of miniature marshmallows to your initial melt, especially if you find the mixture a bit stiff after adding the cereal.
- Don't Over-Mix: Once the cereal is added, mix just enough to coat. Over-mixing can crush the cereal and lead to a tougher texture.
- Hands-On Pressing: Greasing your hands lightly with butter or a neutral oil can make pressing the mixture into the pan much easier and less sticky than using a spatula alone.
- Watermelon Pops: For a fun, handheld version, carefully insert a popsicle stick into the bottom of each wedge immediately after cutting, while the treats are still slightly pliable but firm enough to hold their shape. Let them set completely after inserting the sticks.
- Cookie Cutter Fun: Instead of round pans, you can press the entire green and pink mixture into a large rectangular pan. Once cooled, use watermelon-themed cookie cutters (or any fun summer shapes!) to cut out individual treats. Remember to layer green, then pink, then chocolate chips.
- Storage: Store your vibrant watermelon Rice Krispies treats in an airtight container at room temperature for up to 3-4 days to maintain their freshness and chewiness.
These small adjustments can make a big difference in the final product, ensuring your treats are not only visually stunning but also perfectly textured and flavored.
Conclusion
These vibrant watermelon Rice Krispies treats are more than just a dessert; they're a celebration of summer. Easy to make, incredibly cute, and bursting with optional watermelon flavor, they are guaranteed to be the star attraction at your next BBQ or party. Say goodbye to complicated baking and hello to simple, joyful sweetness that captures the essence of the season. So gather your ingredients, unleash your inner culinary artist, and get ready to delight everyone with these adorable, delicious, and undeniably fun summer treats!
